
As the holiday season approaches, so does the delightful prospect of indulging in sweet treats that bring joy to our hearts and smiles to our faces. For those who adore the idea of creating mouth-watering desserts but want to avoid the time-consuming and sometimes complicated process of baking, no-bake sweets are the answer. These easy, quick, and often no-cook treats provide the perfect balance of flavors and textures that everyone craves during the holiday season. From creamy peanut butter snowballs to festive Grinch Oreo balls, the following recipes are perfect for any occasion, whether you’re hosting a party, looking for a homemade gift, or simply craving something sweet.
Let’s dive into a collection of delicious no-bake holiday sweets that will steal the spotlight at any gathering. With just a few ingredients and minimal preparation, these treats will satisfy your sweet tooth while leaving you more time to enjoy the festive season.
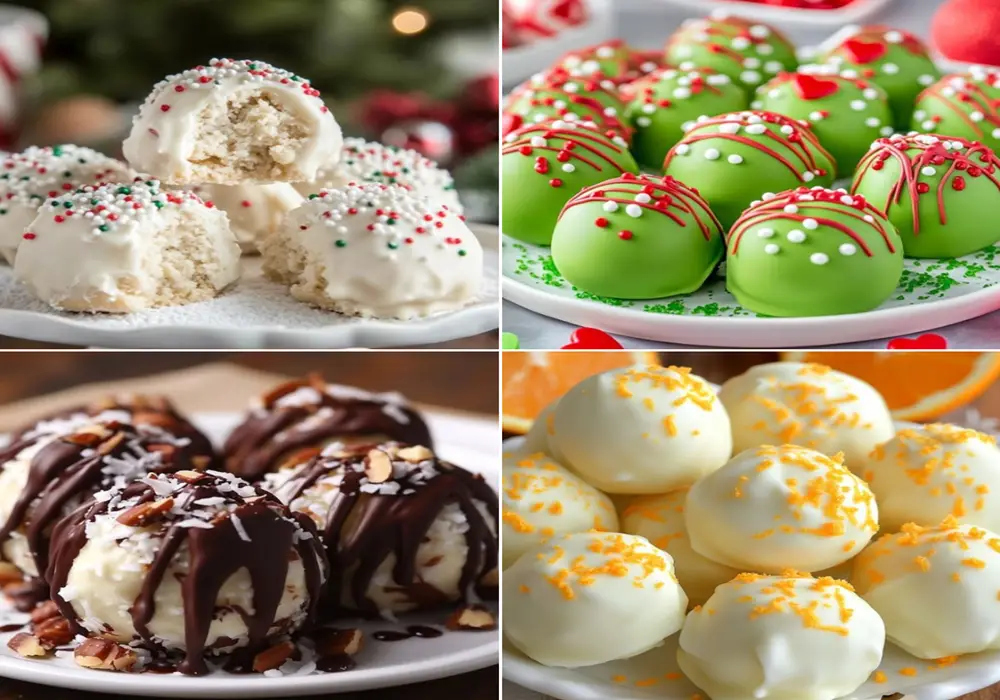
Peanut Butter Snowballs: A Festive Delight
Peanut butter snowballs are the perfect combination of rich, creamy peanut butter and the sweet, velvety coating of white chocolate. These bite-sized delights are both visually stunning and irresistibly delicious, making them an excellent choice for holiday celebrations. Whether you’re hosting a festive party or preparing a batch of treats for loved ones, these peanut butter snowballs are guaranteed to be a hit.
Ingredients:
- 1 cup creamy peanut butter (avoid natural peanut butter for the right texture)
- 2 tablespoons butter (softened to room temperature)
- 1 teaspoon vanilla extract
- 1 ½ cups powdered sugar (for a smooth, sweet consistency)
- 1 cup graham cracker crumbs (adds a touch of crunch)
- 8 ounces white chocolate bark, chips, or candy melts (for coating)
- Holiday sprinkles (optional, for an extra festive touch)
Instructions:
- Prepare the Peanut Butter Mixture: In a large mixing bowl, blend together the peanut butter, softened butter, and vanilla extract until smooth. A hand mixer or stand mixer works best for a creamy consistency.
- Incorporate the Dry Ingredients: Add the powdered sugar and graham cracker crumbs to the peanut butter mixture. Stir well until it forms a dough-like consistency.
- Shape the Snowballs: Use a small cookie scoop or tablespoon to portion out the dough. Roll each portion into smooth 1-inch balls and place them on a parchment-lined baking sheet.
- Chill the Truffles: Refrigerate the peanut butter balls for 30 minutes, allowing them to firm up for easier handling.
- Melt the White Chocolate: While the truffles chill, melt the white chocolate in a microwave-safe bowl, microwaving in 30-second intervals, stirring after each interval until fully melted and smooth.
- Coat the Snowballs: Once chilled, dip each peanut butter ball into the melted white chocolate using a fork or toothpick. Gently tap the fork to remove any excess chocolate before placing the balls back on the baking sheet.
- Decorate with Festive Sprinkles: If desired, drizzle any leftover white chocolate over the snowballs or top with colorful holiday sprinkles for a festive touch.
- Allow the Chocolate to Set: Refrigerate the snowballs for an additional 15 minutes to let the white chocolate coating harden.
These snowballs are perfect for any gathering and are even better when packaged as gifts. You can also experiment with chocolate coatings or topping variations, such as using chopped nuts instead of sprinkles for extra texture.
No-Bake Oreo Balls: A Classic Favorite
Oreo balls are another quintessential holiday treat that’s sure to impress. The combination of the beloved Oreo cookie and rich cream cheese filling, all coated in decadent chocolate, makes these bite-sized balls a crowd favorite. Their simple preparation and versatility for customization (using milk or dark chocolate coatings) make them a perfect treat to whip up in no time.
Ingredients:
- 1 package Oreo cookies (36 cookies)
- 8 oz cream cheese, softened
- 1 bag of chocolate chips (milk or dark)
- Sprinkles or festive decorations (optional)
Instructions:
- Crush the Oreos: Crush the Oreo cookies into fine crumbs using a food processor or by placing them in a zip-top bag and smashing with a rolling pin.
- Make the Dough: In a large bowl, combine the crushed Oreos and softened cream cheese. Mix together until well combined and the dough becomes thick.
- Shape the Balls: Roll the dough into 1-inch balls and place them on a baking sheet lined with parchment paper.
- Chill the Balls: Put the baking sheet in the refrigerator for about 30 minutes to firm up the balls.
- Melt the Chocolate: While the balls chill, melt the chocolate chips. Do this in a microwave-safe bowl in 30-second bursts, stirring after each interval, or use a double boiler for a smooth, even melt.
- Dip the Balls: Once the Oreo balls are firm, dip them into the melted chocolate using a fork or dipping tool. Let any excess chocolate drip off before placing them back on the parchment paper.
- Decorate (Optional): If you like, sprinkle the balls with festive decorations, sprinkles, or toppings while the chocolate is still soft.
- Set and Serve: Place the dipped Oreo balls in the fridge for another 15-20 minutes until the chocolate is completely set. Then, enjoy these creamy, indulgent treats!
These Oreo balls are as delightful to make as they are to eat. They can be customized with different chocolate coatings, colors, or festive sprinkles to make them even more fun!
Grinch Oreo Balls: A Holiday Treat with a Twist
Get into the holiday spirit with these Grinch-inspired Oreo balls. The vibrant green candy coating and the cute red candy heart topping make these irresistible bites perfect for your holiday table. With red velvet Oreos, cream cheese, and a touch of candy melt magic, these Grinch Oreo balls will brighten any holiday spread.
Ingredients:
- 24.4 oz Red Velvet Oreos (2 packages, 44 cookies)
- 8 oz cream cheese (softened)
- 15 oz light green candy melts (for that Grinchy glow)
- Red candy hearts (for decoration)
Instructions:
- Oreo Magic: Line your baking sheet with parchment paper. Crush the Red Velvet Oreos into crumbs using a food processor or crush them with a rolling pin inside a zippered plastic bag.
- Whip It Good: In a mixing bowl, beat the softened cream cheese until smooth and creamy. Add in the Oreo crumbs and mix until it becomes one gooey mixture.
- Roll and Chill: Scoop about 1.5 tablespoons of the Oreo mixture and roll it into smooth balls. Place them on the baking sheet and refrigerate for at least 2 hours.
- Candy Coating Time: Melt the green candy melts in a microwave or double boiler. Stir frequently to avoid burning.
- Dippity-Do-Da: Dip each Oreo ball into the melted green candy. Tap the fork gently to shake off any excess before placing them back on the baking sheet.
- Drizzle & Heart It Up: For an extra touch, drizzle more green candy over the top or pipe it on for a nice swirl. Top each ball with a red candy heart.
- Let ‘Em Chill: Return the balls to the fridge for about 30 minutes to allow the candy coating to harden.
These Grinch Oreo balls add a pop of color and festive charm to your holiday treat lineup. Their fun appearance and delicious flavor will make them the talk of your celebration!
No-Bake Coconut Cream Balls: A Tropical Treat
If you’re a fan of coconut, these coconut cream balls are the ultimate no-bake dessert for you. With a creamy coconut center, coated in luscious chocolate, these bites offer a tropical twist on traditional holiday sweets. Easy to make and incredibly rich, these coconut cream balls are bound to become a favorite in your collection of no-bake desserts.
Ingredients:
- 2 cups sweetened shredded coconut
- ½ cup sweetened condensed milk
- 1 teaspoon vanilla extract
- ¼ cup unsalted butter (softened)
- 1 cup powdered sugar
- 1 cup semi-sweet chocolate chips
- 1 teaspoon coconut oil (optional, for smoother chocolate coating)
Instructions:
- Prepare the Mixture: In a large bowl, combine the shredded coconut, sweetened condensed milk, vanilla extract, softened butter, and powdered sugar. Mix until the ingredients are well blended and the mixture is sticky but firm.
- Form the Balls: Scoop out about 1 tablespoon of the mixture and roll it into small balls using your hands. Place them on a parchment-lined baking sheet.
- Chill the Balls: Refrigerate the coconut balls for 1-2 hours until firm.
- Melt the Chocolate: In a microwave-safe bowl, melt the chocolate chips with the coconut oil in 20-second intervals, stirring until smooth.
- Coat the Balls: Dip each chilled coconut ball into the melted chocolate, ensuring it is fully coated. Place the coated balls back onto the parchment-lined baking sheet.
- Set the Chocolate: Refrigerate the coated balls for 30 minutes to allow the chocolate to set. Serve chilled or at room temperature.
These coconut cream balls are the perfect balance of tropical coconut and rich chocolate—simple to prepare and perfect for holiday gifting.
No-Bake Orange Creamsicle Truffles: A Taste of Nostalgia
Nothing brings back memories of summer quite like the classic creamsicle flavor. These no-bake orange creamsicle truffles capture that nostalgic taste in a bite-sized treat that’s perfect for winter holidays. With their bright orange flavor and creamy texture, these truffles are a refreshing addition to your holiday dessert spread.
Ingredients:
- 1 cup white chocolate melting chips
- ¼ cup unsalted butter
- Zest from 1 orange
- 3 tbsp heavy cream
- ½ tsp orange extract
- A few drops of orange food coloring (optional)
- ½ cup confectioners’ sugar, divided
Instructions:
- Prepare the Orange Truffle Mixture: In a microwave-safe bowl, combine the white chocolate melting chips and butter. Microwave in 20-second intervals, stirring between each, until fully melted and smooth. Stir in the orange zest, heavy cream, orange extract, and food coloring (if using).
- Chill the Mixture: Cover the bowl with plastic wrap and refrigerate for 1-2 hours until the mixture is firm enough to scoop and roll into balls.
- Form the Truffles: Using a small cookie scoop or spoon, scoop out portions of the chilled mixture and roll them into 1-inch balls. Place the rolled truffles onto a parchment-lined baking sheet.
- Coat the Truffles: Put the confectioners’ sugar into a shallow dish and roll each truffle in the sugar until fully coated. For an extra frosted effect, roll the truffles a second time just before serving.
These orange creamsicle truffles will add a burst of citrusy sweetness to your holiday spread, delighting guests with every bite.
Vanilla Pecan Pralines: A Sweet Southern Touch
For those who enjoy rich, nutty flavors, vanilla pecan pralines offer a creamy, indulgent treat that is both sweet and satisfying. The pecans add a delightful crunch to the rich, caramel-like base, making these pralines a favorite for the holidays.
Ingredients:
- 2 ½ cups granulated sugar
- 7 oz evaporated milk
- ¼ cup butter, cubed
- 1 package (11 oz) vanilla or white chocolate chips (Ghirardelli recommended)
- 4 oz marshmallow creme
- 1 teaspoon vanilla extract
- 2 cups chopped pecans
Instructions:
- Prepare the Surface: Place two long sheets of waxed paper on cookie sheets or your countertop.
- Cook the Sugar Mixture: In a heavy-bottomed saucepan, combine sugar, milk, and butter. Cook over medium-low heat, stirring constantly. Once it begins to boil, reduce to a low boil and continue stirring for 8 minutes.
- Add Vanilla and Marshmallow: Stir in the vanilla chips and marshmallow creme until the chips are fully melted. Remove from heat, then mix in the vanilla extract and chopped pecans.
- Cool the Mixture: Let the mixture cool for 2-3 minutes until it thickens but remains creamy.
- Form the Pralines: Drop spoonfuls of the mixture onto the prepared waxed paper. Let the pralines cool and set completely.
- Store: Store the pralines in an airtight container, layering them between sheets of waxed paper to prevent sticking.
These vanilla pecan pralines bring a sweet, creamy, and nutty touch to your holiday celebrations. They’re perfect for gifting or enjoying with family.